How to make a worksheet Copilot™ reads correctly
A step-by-step run through the add-in, from the first scan to a fix and back again. Ten minutes, and the scan and every explanation are free — only the fixes are paid.
What the problem actually is
Copilot™ does not fail on a messy sheet by saying it is confused. It answers, confidently, from whatever it managed to read — and a merged title, a blank column or a total row mixed into the data all change what it reads without changing what you see.
This add-in scores the active worksheet against the things known to do that, and attaches to each one a sentence saying why Copilot™ cares. The score is 100 minus 18 per blocker and 12 per degrader, floored at zero. It is blunt on purpose: it exists to be compared before and after a cleanup, not read as a grade. A sheet only reads Copilot-ready when nothing at all was found.
Before you start
- Excel™ for Windows or Excel™ on the web. The pane is the same on both. On a Mac the pane scans but turns fixes off, because nothing has been verified on macOS.
- The add-in installed. See the support page for that.
- A worksheet with a table of data on it. The screenshots below use a small regional sales report — the ordinary kind, formatted for a person to read.
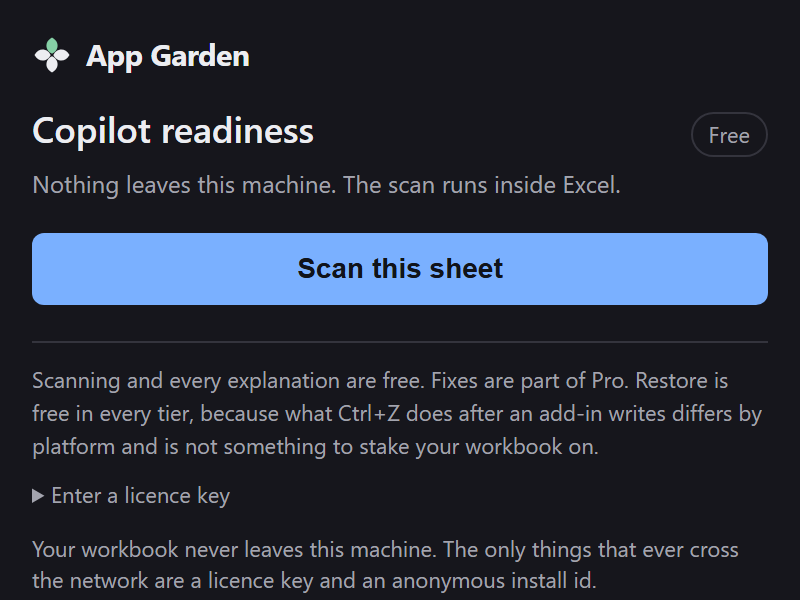
- Nothing leaves your machine. The scan runs inside the task pane. The only things that ever cross the network are a licence key and an anonymous install id. The privacy notice says so in full.
Step 1 — Open the pane
Open the worksheet, then Home › AI readiness. The pane opens with one button and nothing else. It has not read anything yet.
Step 2 — Scan the sheet
Press Scan this sheet. It reads the used range and reports a score, then the findings, worst first. A small sheet takes a moment. On a sheet of hundreds of thousands of cells the pane shows a progress box while it reads, and it can take a minute or more, longer on the web.
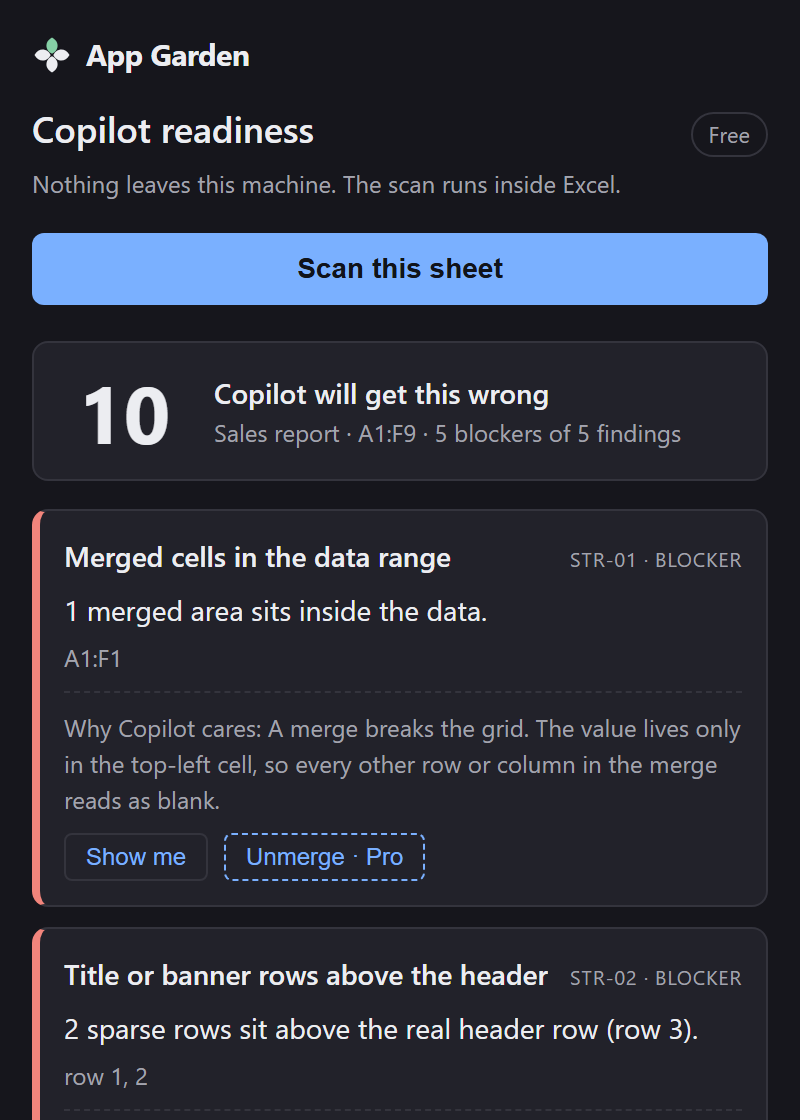
Everything here is free, on every sheet, forever: the scan, the score, and every explanation. This is one worksheet at a time — the active one. Whole-workbook scanning is not built, on any tier.
Step 3 — Read a finding
Each finding is one card, and each card says five things:
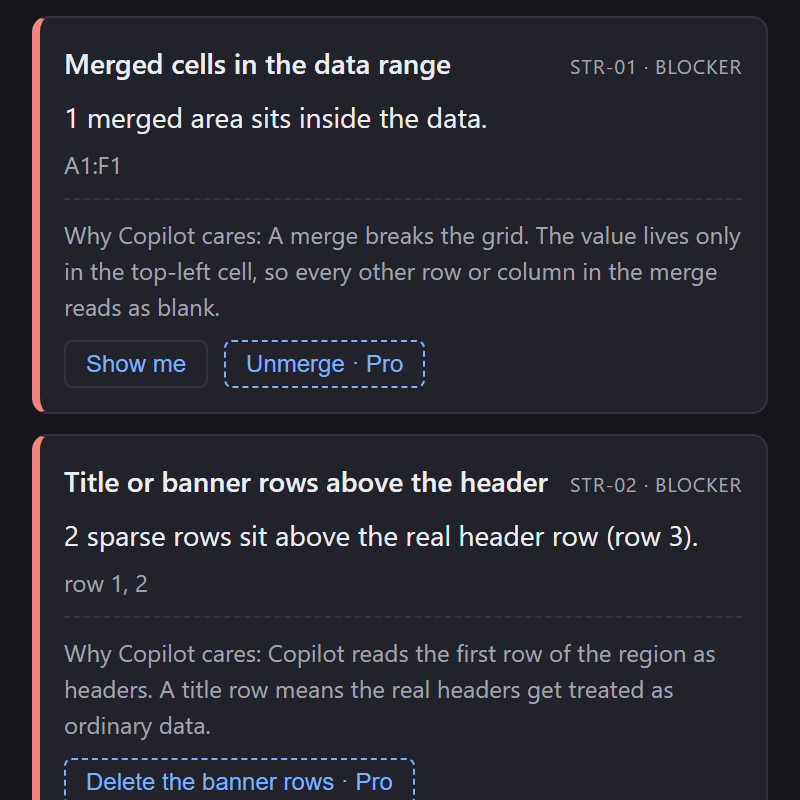
- The check, named in plain words — “Merged cells in the data range”.
-
An id and a severity, top right.
STR-01 · BLOCKER. The id is stable, so it is the useful thing to quote in a support email. - What was found, counted: “1 merged area sits inside the data.”
- Where —
A1:F1, or a list of row or column numbers. - Why Copilot™ cares. The paragraph in grey. Worth reading once per kind of finding; it is the part that tells you whether the finding matters in your workbook.
The colour down the left edge is severity. Red is a blocker — something that changes what Copilot™ reads. Amber is a degrader, which makes answers worse without breaking them. Grey is advisory, kept out of the score entirely.
Step 4 — Fix it Pro
On the free tier the fix button is still there, dashed and labelled with what it would do, so you can see the whole shape of the cleanup before paying for any of it.
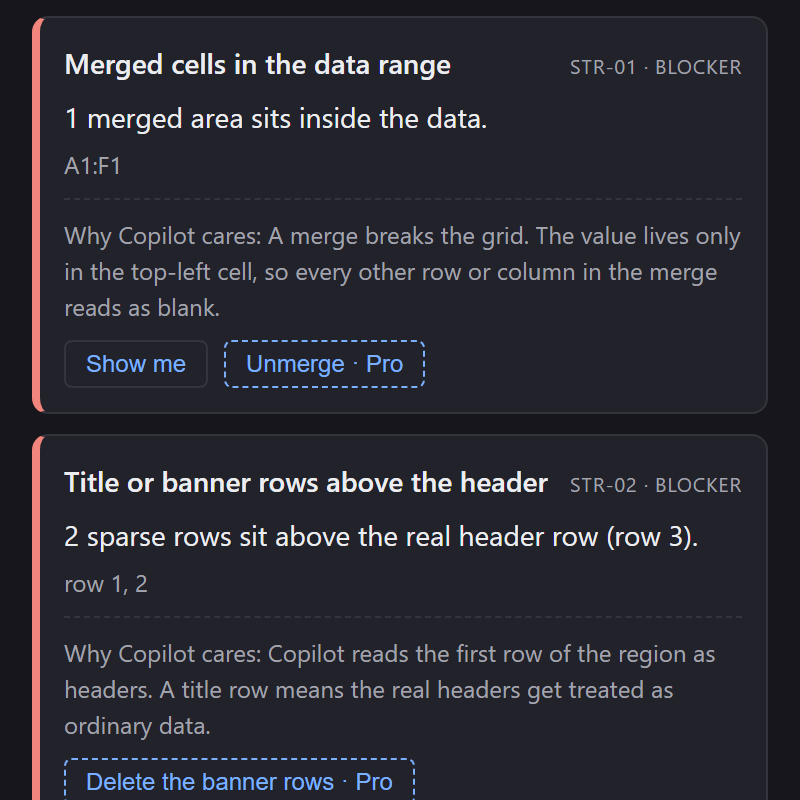
On a paid licence the button is live. Press it and, for a guided fix, the pane explains itself before it touches anything:
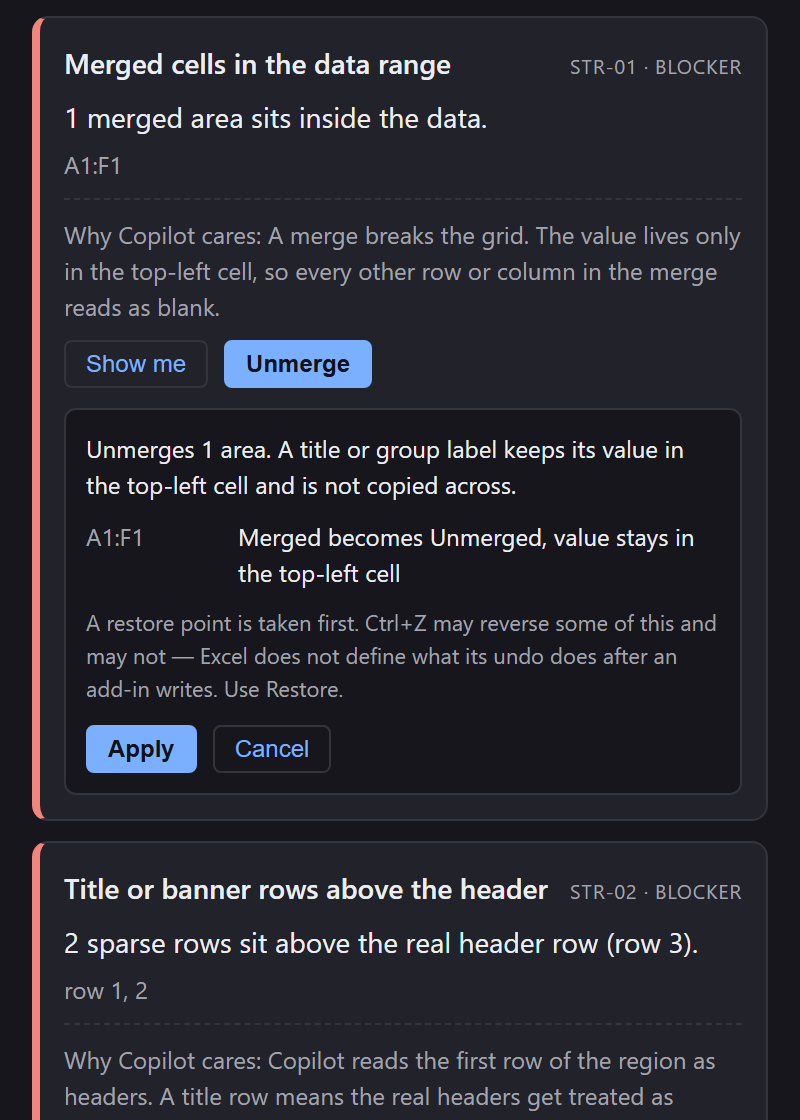
Sometimes the pane cannot tell which row holds your column names. That happens when blank rows split the data, or when the top row does not look like headers. Instead of guessing, it asks. Pick the row, or say there is not one, and Apply stays off until you have answered. The preview updates to match your choice.
While a fix is writing, the pane shows a progress box naming each step. Excel™ cannot be locked by an add-in, so do not type into the sheet or close the pane until it finishes. On a small sheet it is instant. On a very large one it can take minutes.
Press Apply and the pane writes the change, re-scans, and shows you the new score against the old one.
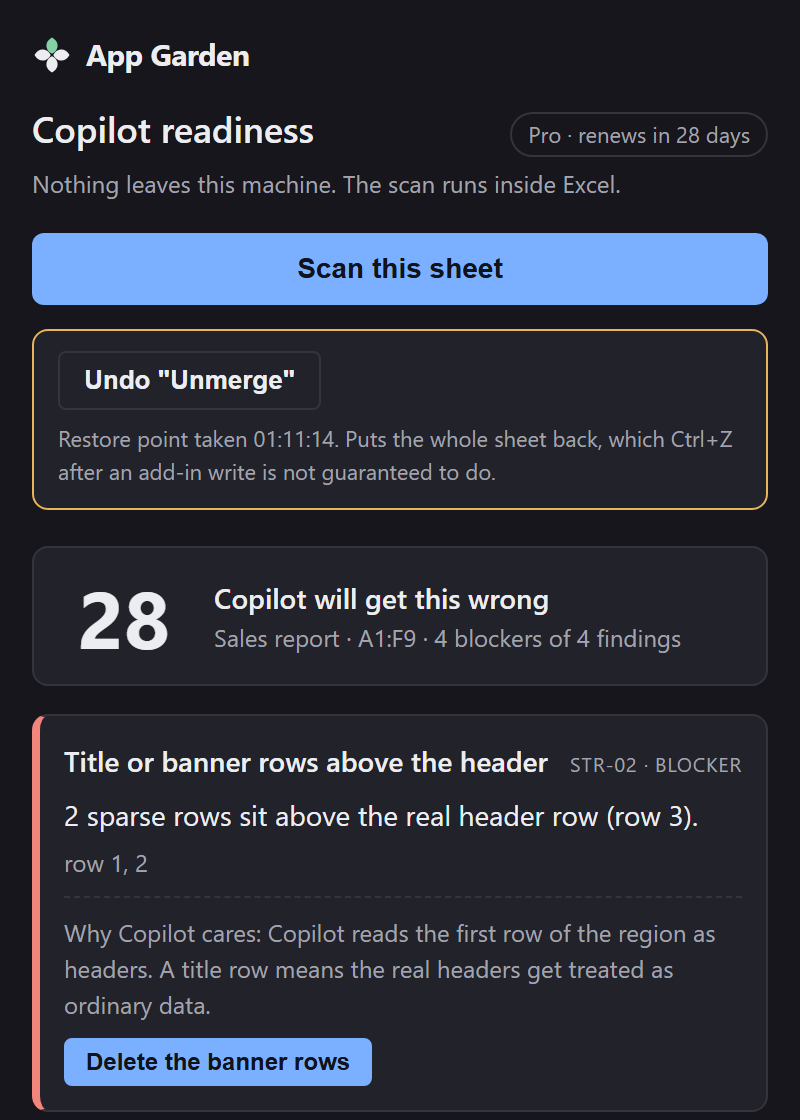
Fixes are applied one at a time, deliberately. There is no “fix everything” button: several of these checks have more than one defensible answer, and a batch would hide which of them changed your sheet.
Step 5 — Restore, if you want it back
Restore is free on every tier, always. It does not lapse with a licence and it keeps working after one is cancelled — an add-in that can write to your workbook but charges to reverse it would be indefensible.
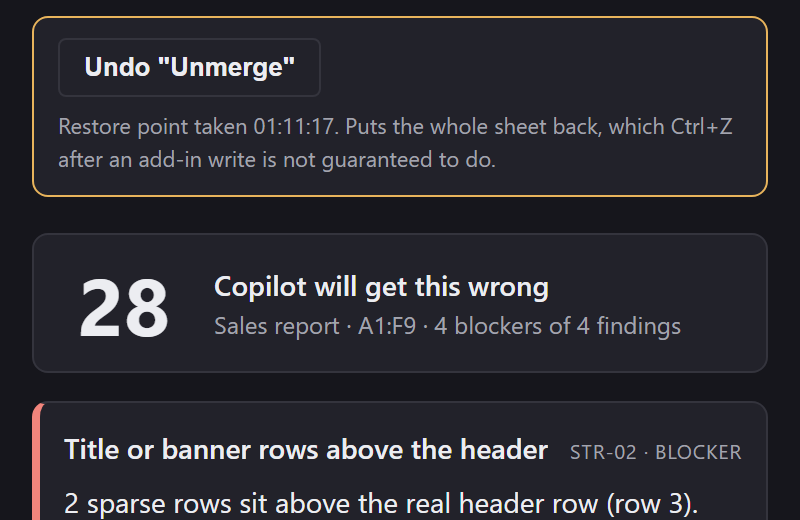
What Undo reverts depends on the fix:
- Fixes that change cell contents — tidying text, converting numbers, renaming headers, and setting calculation mode. Undo reverts the cells the fix changed to their original form. Anything you have changed elsewhere on the sheet since stays as it is.
- Fixes that move cells — unmerging, deleting rows or columns, and making a Table. Undo returns the whole sheet to its original form before the fix, so anything typed on that sheet since is undone too.
After several fixes, Undo takes the most recent first. Press it again for the one before.
Use this rather than Ctrl+Z. What Excel™'s own undo does after an add-in writes to a sheet is not defined by Office and it varies by platform. This button is the reliable route.
Every restore point is saved in the workbook before the fix writes anything, so it survives the pane being closed. If the pane was closed partway through a fix, it says so the next time it opens and points you at Undo. Undo checks every cell once it has finished, and keeps the restore point if anything does not match, so you can run it again.
Happy with the fixes? Press Keep changes. That drops every restore point. A large restore point is a hidden copy of the cells stored in the workbook, and Keep changes deletes those too.
Step 6 — Entering a licence key
Open Enter a licence key at the bottom of the pane, paste the key from the end of checkout, and press Activate. It takes effect immediately — no restart.
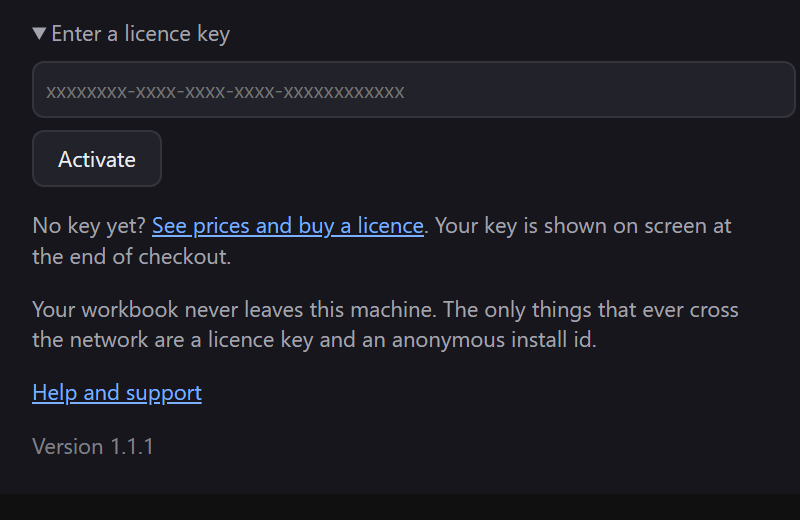
If the pane ever says your licence is no longer active, it is almost always a card that expired. Scanning keeps working, and so does Restore.
What it checks, in full
Everything below is scored except the advisories, which are reported and left out of the number.
- Blockers — merged cells in the data range (STR-01); title or banner rows above the header (STR-02); blank rows or columns inside the range (STR-03); more than one table on the sheet (STR-04); total or subtotal rows mixed into the data (STR-05); data that is not a real Excel™ Table (STR-06); calculation mode not set to Automatic (ENV-01).
- Degraders — numbers stored as text (TYP-01); dates stored as text, or mixed date formats in one column (TYP-02); mixed value types in one column (TYP-03); blank or duplicate headers (HDR-01); two-row or grouped headers (HDR-02); whitespace and inconsistent casing (CLN-01); hidden rows or columns inside the range (CLN-02).
- Advisories — external links, volatile formulas or a very wide sheet (ADV-01); cryptic sheet or table names (ADV-02).
- A manual check — Strict Open XML format, and SharePoint™ check-out state (ENV-02). Both produce an outright unsupported-file-state refusal from Copilot™, and neither can be seen from inside an add-in, so they are never scored. A guessed finding would be worse than no finding.
When it will not help
- More than one sheet. The active worksheet, one at a time. Whole-workbook scanning is not built.
- Setting calculation mode back to Automatic on Excel™ for Windows. The host silently refuses it, so the pane tells you to change it by hand under Formulas › Calculation Options. That is Excel™'s behaviour, not a failed fix.
- Telling you whether the data is right. This scores how readable the sheet is, not whether the numbers on it are true.
- Very large sheets. Excel™ for Windows scans a sheet of up to about 4.9 million cells — the used range, rows times columns. Excel™ on the web has been tested to 1 million. The web limits how much an add-in can read at once by size, so very long text in many cells can be refused sooner. Either way the pane says the sheet is too large rather than giving a wrong score. Move some of the data to another sheet, or open the workbook in Excel™ for Windows.
- Excel™ for Mac. Not supported. The pane scans, which is read-only, and turns fixes off. The add-in is not offered on iPad.
If something looks wrong
Email [email protected], and say which platform you are on and what the pane showed — the finding id is the useful thing to quote. If a scan reported something you believe is wrong, the workbook itself is the most useful thing you can send — but only send one you are content to share, and read the privacy notice first.